
Here's a tiny, nifty utility, that will put you in control of services and startup files in Debian.
rcconf
to install type in the terminal:
#apt-get update
#apt-get install rcconf
to run the utility, type rcconf in the terminal
to enable or disable a service, select an item and press the space bar on the keyboard.
==>http://www.debianhelp.co.uk/unwanted.htm
DebianDog Utilities
- Attachments
-
- rcconf.jpeg
- (23.07 KiB) Downloaded 5135 times

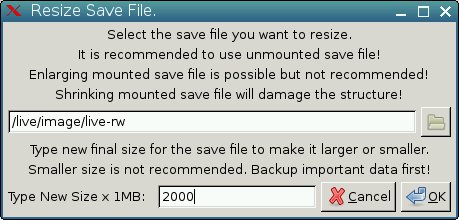
Resize Save File GUI utility:
Deb package available (included in DebianDog):
http://smokey01.com/saintless/DebianDog ... 1_i386.deb
Use it only with unmounted save file! You need to boot without save-file (no-persistent) option.
You can enlarge mounted save file but it is not recommended and if you try just in case backup important data first.
Shrinking mounted save file will damage the file structure!
Start it from terminal:
or from Utility --> Resize Save File
Choose the save file location (live-rw, changes.dat, etc...) and type new final size in Mb. Click OK button.
In the example on the picture live-rw will be resized to 2000Mb no matter what is the start point size of live-rw.
Deb package available (included in DebianDog):
http://smokey01.com/saintless/DebianDog ... 1_i386.deb
Use it only with unmounted save file! You need to boot without save-file (no-persistent) option.
You can enlarge mounted save file but it is not recommended and if you try just in case backup important data first.
Shrinking mounted save file will damage the file structure!
Start it from terminal:
Code: Select all
resize-saveChoose the save file location (live-rw, changes.dat, etc...) and type new final size in Mb. Click OK button.
In the example on the picture live-rw will be resized to 2000Mb no matter what is the start point size of live-rw.
Last edited by saintless on Fri 18 Mar 2016, 08:10, edited 4 times in total.
New packages, updated packages and fixes:
Hosting for all DebianDog versions (thanks to KazzaMozz)
DebianDog backup download site
DebianDog second backup download site
Final iso images will be uploaded also here (thanks to KazzaMozz)
All future updates will be provided from apt-get or Synaptic as deb packages from DebianDog repository.
Typing apt-get upgrade will upgrade all packages from official Debian repository and from DebianDog repository.
Typing apt-get install package-name will upgrade only one package.
All fixes will be listed in this post.
All extra packages (not included in DebianDog) will be uploaded here and easy installable with apt-get install package-name or Synaptic.
=========================================
Fixes list moved here.
======================================
Use this command in terminal (after running apt-get update first) and read the Description: line for information about each package:
Or download the deb, use XFE file manager and Right click -> View on deb package. (Or Right click -> Open With -> xfp). Read the Description: line for each package.
=======================================
DebianDog package repository - all packages here are available for installing/reinstalling with apt-get or Synaptic.
Packages not included in DebianDog repository - the reason not to include them in repository is these packages work fine for DebianDog but could create some problems in standard Debian.
Building deb files instruction and testing post
===========================================
Saved for later projects information:
For later SID version update
Testing squashfs module with dpkg synchronization scripts for every possible case (universal solution). --> moded from Fred
===========================================
Hosting for all DebianDog versions (thanks to KazzaMozz)
DebianDog backup download site
DebianDog second backup download site
Final iso images will be uploaded also here (thanks to KazzaMozz)
All future updates will be provided from apt-get or Synaptic as deb packages from DebianDog repository.
Typing apt-get upgrade will upgrade all packages from official Debian repository and from DebianDog repository.
Typing apt-get install package-name will upgrade only one package.
All fixes will be listed in this post.
All extra packages (not included in DebianDog) will be uploaded here and easy installable with apt-get install package-name or Synaptic.
=========================================
Fixes list moved here.
======================================
Use this command in terminal (after running apt-get update first) and read the Description: line for information about each package:
Code: Select all
apt-cache show package-name=======================================
DebianDog package repository - all packages here are available for installing/reinstalling with apt-get or Synaptic.
Packages not included in DebianDog repository - the reason not to include them in repository is these packages work fine for DebianDog but could create some problems in standard Debian.
Building deb files instruction and testing post
===========================================
Saved for later projects information:
For later SID version update
Testing squashfs module with dpkg synchronization scripts for every possible case (universal solution). --> moded from Fred
===========================================
Last edited by saintless on Sun 25 Oct 2015, 14:27, edited 226 times in total.
Hi All,
Here's modified rcconf using Xdialog.
Default is Xdialog but can still also be run from terminal to use dialog or whiptail.
For example:
Fred
Here's modified rcconf using Xdialog.
Default is Xdialog but can still also be run from terminal to use dialog or whiptail.
For example:
Code: Select all
rcconf --dialog- Attachments
-
- rcconf-Xdialog.zip
- (8.91 KiB) Downloaded 631 times
-
- rcconf-Xdialog.png
- (43.33 KiB) Downloaded 4965 times
For anyone who prefer to use the default Puppy Firewall here is deb package:
http://smokey01.com/saintless/DebianDog ... 1_i386.deb
Works for both DebianDog versions (OpenBox and Jwm).
Install and start from Settings -> Firewall Puppy.
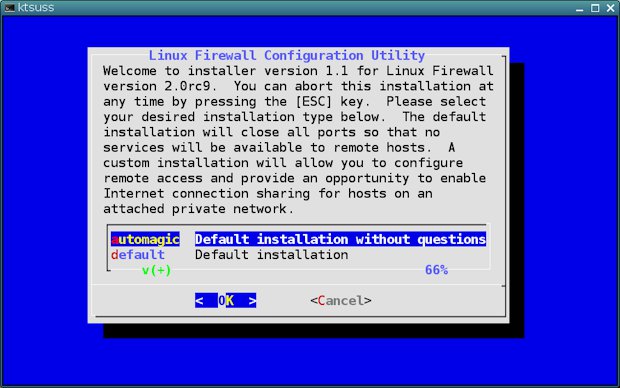
Confirm your configuration choice:
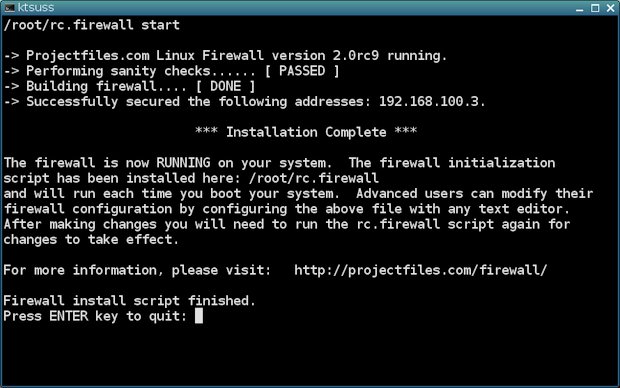
After every reboot you will see this window:
Configuration files are changed. The main script is in /opt/bin and it creates $HOME/rc.firewall script which is started from $HOME/Startup/firewall-puppy script after login and can have different setup for each user account.
For user account there will be GUI window to type root password.
========================================
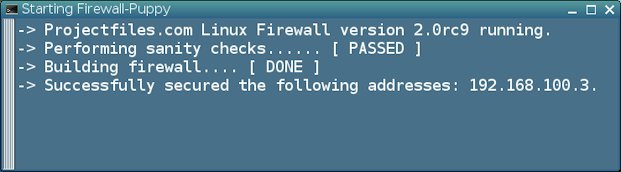
Edit: Sancxjo posted alternative firewall startup + log writing:
Starting firewall line in /etc/rc.local:
File /etc/init.d/rc.firewall:
It doesn't need password from user account this way and writes log.
===========================================
http://smokey01.com/saintless/DebianDog ... 1_i386.deb
Works for both DebianDog versions (OpenBox and Jwm).
Install and start from Settings -> Firewall Puppy.
Confirm your configuration choice:
After every reboot you will see this window:
Configuration files are changed. The main script is in /opt/bin and it creates $HOME/rc.firewall script which is started from $HOME/Startup/firewall-puppy script after login and can have different setup for each user account.
For user account there will be GUI window to type root password.
========================================
Edit: Sancxjo posted alternative firewall startup + log writing:
Starting firewall line in /etc/rc.local:
Code: Select all
/etc/init.d/rc.firewall startCode: Select all
#! /bin/sh
### BEGIN INIT INFO
# Provides:          rc.firewall
# Required-Start:    $all
# Required-Stop:
# Default-Start:     2 3 4 5
# Default-Stop:
# Short-Description: Run /etc/rc.firewall if it exist
### END INIT INFO


PATH=/sbin:/usr/sbin:/bin:/usr/bin

. /lib/init/vars.sh
. /lib/lsb/init-functions

do_start() {
	if [ -x /etc/rc.firewall ]; then
	        [ "$VERBOSE" != no ] && log_begin_msg "Running local boot scripts (/etc/rc.firewall)"
	        echo "`date +%d.%m.%Y_%T%t`Lanĉo de barilo">>/var/log/user.log
		/etc/rc.firewall
		ES=$?
		[ "$VERBOSE" != no ] && log_end_msg $ES
		return $ES
	fi
}

case "$1" in
    start)
	do_start
        ;;
    restart|reload|force-reload)
        echo "Error: argument '$1' not supported" >&2
        exit 3
        ;;
    stop)
        ;;
    *)
        echo "Usage: $0 start|stop" >&2
        exit 3
        ;;
esac
===========================================
Last edited by saintless on Fri 18 Mar 2016, 08:11, edited 3 times in total.
Script for creating new initrd files for live-boot-2x and porteus-boot
Special script mostly for my own use but it may be interested for others.
If new kernel is installed with apt-get it will create initrd.img for live-boot-3x only. This script will auto-create live-boot-2x and porteus-boot initrd files from initrd.img for new installed kernel.
Download and extract the archive in /opt/bin for example:
http://smokey01.com/saintless/DebianDog ... initrd.zip
Make sure you have all three initrd files from DebianDog iso inside /live/image/live (initrd.img, initrd1.img and initrd1.xz).
Boot with live-boot-2x or porteus-boot and run the script from terminal:
Choose initrd.img for new installed kernel (usually it is located in /boot) and click OK button.
In short the default initrd files for DebianDog live-boot-2x and porteus-boot will be extracted. /lib/modules content will be replaced with the one for your new kernel and new repack will be made. XZ compression is used and creating new initrd images may take some time.
When the script finish you will see this window:
/live/image/live/new-initrd1.img - live-boot-2x for your new kernel.
/live/image/live/new-initrd1.xz - porteus-boot for your new kernel.
The script is tested with i486, i686 pae and no-pae architecture. I don't know if it will work properly with others.
.
Special script mostly for my own use but it may be interested for others.
If new kernel is installed with apt-get it will create initrd.img for live-boot-3x only. This script will auto-create live-boot-2x and porteus-boot initrd files from initrd.img for new installed kernel.
Download and extract the archive in /opt/bin for example:
http://smokey01.com/saintless/DebianDog ... initrd.zip
Make sure you have all three initrd files from DebianDog iso inside /live/image/live (initrd.img, initrd1.img and initrd1.xz).
Boot with live-boot-2x or porteus-boot and run the script from terminal:
Code: Select all
make-new-initrdIn short the default initrd files for DebianDog live-boot-2x and porteus-boot will be extracted. /lib/modules content will be replaced with the one for your new kernel and new repack will be made. XZ compression is used and creating new initrd images may take some time.
When the script finish you will see this window:
/live/image/live/new-initrd1.img - live-boot-2x for your new kernel.
/live/image/live/new-initrd1.xz - porteus-boot for your new kernel.
The script is tested with i486, i686 pae and no-pae architecture. I don't know if it will work properly with others.
.
Last edited by saintless on Fri 18 Mar 2016, 08:13, edited 4 times in total.
https://www.ibm.com/developerworks/library/l-initrd/Sylvander wrote:What is an initrd file?
Just boots the system.What does it do?
http://murga-linux.com/puppy/viewtopic. ... 571#771571
If you decide to install new kernel on DebianDog with apt-get or synaptic only initrd file for live-boot-3x will be auto-created.Why would you want to make a new one?
initrd1.img (live-boot-2x) and initrd1.xz (porteus-boot) will not be available if you boot with your new installed kernel. You have to create them manually following the instruction in the link above. make-new-initrd script may save you a lot of work.
Last edited by saintless on Sun 06 Mar 2016, 14:54, edited 1 time in total.
Hi All,
Here are some ffmpeg scripts I made.
Attached: Some-FFmpeg-scripts.tar.gz
It started by creating a simple gui for extracting audio from video but it got a little out of hand.
I'm specially happy about the way it turned out to show a nice progress bar with percentage and time remaining.
ffmpeg is not installed by default on DebianDog but you can easily install it:
Or: create ffmpeg.sfs with FFmpeg2sfs from the menu and load it with sfs-load.
Or: Here's a static build of latest ffmpeg:
https://drive.google.com/file/d/0ByBgCD ... sp=sharing
Just put the ffmpeg binary somewhere in PATH (e.g. in /opt/bin)
A ReadMe file is included in the archive.
------------------------------
ReadMe content:
*** Some-FFmpeg scripts by fredx181 (Fred) ***
All need ffmpeg installed or ffmpeg.sfs module loaded.
Use FFmpeg2sfs from the menu to create ffmpeg.sfs.
(Sorry, didn't test on Puppy but I see no reason why these wouldn't work if ffmpeg, yad, dialog and (optional) lame are installed)
7 scripts, half of them are very similar. (I need help to give them proper names)
The difference is mostly in how the the progress is shown (all show percentage and time remaining):
- In a Xdialog window.
- In a xterm terminal window.
What the different scripts do:
- pffmpeg-t and pffmpeg-x:
*** Run ffmpeg from command line with nice progress view. ***
These need to be used from command line, just the same as for ffmpeg e.g.:
pffmpeg-t -i <inputvideo> <options> <outputfile> (showing progress with xterm terminal)
pffmpeg-x -i <inputvideo> <options> <outputfile> (showing progress with Xdialog)
----------------------
- simple-ffmpeg-gui:
Can be executed from file manager and 'yad' gui appears.
Simple gui that allows you to select input video, enter output file and enter options for ffmpeg.
Progress is shown by Xdialog.
----------------------
- video2audio-gui-t and video2audio-gui-x:
Can be executed from file manager and 'yad' gui appears.
These are only for copying or converting audio from video.
Both will give option to select video file, format, bitrate, frequency and channels.
- video2audio-gui-t shows progress in xterm.
- video2audio-gui-x shows progress with Xdialog.
If ffmpeg is not installed there's option included to create ffmpeg.sfs and load it on the fly.
----------------------
- video2audio-t and video2audio-x (as above: '-t' shows progress in terminal and '-x' shows Xdialog progress):
These are also only for copying or converting audio from video.
Both will give option to select video file, format, bitrate, frequency and channels.
Usage can be:
- Drag and Drop video files to the script file.(Then yad dialog appears)
- From command line e.g: video2audio-x <videofile1> <videofile2> <videofile3> ....
- As right-click option from file-manager menu e.g. xfe <open with> or with thunar custom action.
----------------------------------------------
Fred
Here are some ffmpeg scripts I made.
Attached: Some-FFmpeg-scripts.tar.gz
It started by creating a simple gui for extracting audio from video but it got a little out of hand.
I'm specially happy about the way it turned out to show a nice progress bar with percentage and time remaining.
ffmpeg is not installed by default on DebianDog but you can easily install it:
Code: Select all
apt-get install ffmpegOr: Here's a static build of latest ffmpeg:
https://drive.google.com/file/d/0ByBgCD ... sp=sharing
Just put the ffmpeg binary somewhere in PATH (e.g. in /opt/bin)
A ReadMe file is included in the archive.
------------------------------
ReadMe content:
*** Some-FFmpeg scripts by fredx181 (Fred) ***
All need ffmpeg installed or ffmpeg.sfs module loaded.
Use FFmpeg2sfs from the menu to create ffmpeg.sfs.
(Sorry, didn't test on Puppy but I see no reason why these wouldn't work if ffmpeg, yad, dialog and (optional) lame are installed)
7 scripts, half of them are very similar. (I need help to give them proper names
The difference is mostly in how the the progress is shown (all show percentage and time remaining):
- In a Xdialog window.
- In a xterm terminal window.
What the different scripts do:
- pffmpeg-t and pffmpeg-x:
*** Run ffmpeg from command line with nice progress view. ***
These need to be used from command line, just the same as for ffmpeg e.g.:
pffmpeg-t -i <inputvideo> <options> <outputfile> (showing progress with xterm terminal)
pffmpeg-x -i <inputvideo> <options> <outputfile> (showing progress with Xdialog)
----------------------
- simple-ffmpeg-gui:
Can be executed from file manager and 'yad' gui appears.
Simple gui that allows you to select input video, enter output file and enter options for ffmpeg.
Progress is shown by Xdialog.
----------------------
- video2audio-gui-t and video2audio-gui-x:
Can be executed from file manager and 'yad' gui appears.
These are only for copying or converting audio from video.
Both will give option to select video file, format, bitrate, frequency and channels.
- video2audio-gui-t shows progress in xterm.
- video2audio-gui-x shows progress with Xdialog.
If ffmpeg is not installed there's option included to create ffmpeg.sfs and load it on the fly.
----------------------
- video2audio-t and video2audio-x (as above: '-t' shows progress in terminal and '-x' shows Xdialog progress):
These are also only for copying or converting audio from video.
Both will give option to select video file, format, bitrate, frequency and channels.
Usage can be:
- Drag and Drop video files to the script file.(Then yad dialog appears)
- From command line e.g: video2audio-x <videofile1> <videofile2> <videofile3> ....
- As right-click option from file-manager menu e.g. xfe <open with> or with thunar custom action.
----------------------------------------------
Fred
- Attachments
-
- Simple-ffmpeg-gui.png
- (39.67 KiB) Downloaded 4743 times
-
- Terminal-progress.png
- (34.91 KiB) Downloaded 4725 times
-
- Xdialog-progress.png
- (29.21 KiB) Downloaded 4707 times
-
- video2audio-gui-x.png
- (44.95 KiB) Downloaded 4759 times
-
- Some-FFmpeg-scripts.tar.gz
- (12.63 KiB) Downloaded 722 times
pAVrecord
EDIT: now with splash to tell user to install ffmpeg to use
EDIT: Now find install files for DebianDog (deb) and Puppy (dotpet) on main pavrecord thread here (it is already provided by default in DebianDog and most Puppies but check for latest version):
http://www.murga-linux.com/puppy/viewtopic.php?t=81332
pAVrecord modified for use in DebianDog (just remove the dummy tar extension). Requires ffmpeg and ffplay in addition to mplayer and/or gnome-mplayer and won't work with x11 only video driver; ffplay seems to need vo=xv.
I tested it with the ffmpeg downloadable via the script provided by Toni. Which encoders work will depend on the underlying ffmpeg used but mp4, mp3, aac_q, x264 and x11 screengrab all worked in my tests. Note that with some encoders (such as x264 video) the record video display window will sometimes take a while to open because of the encoding complexity. Pressing stop button, when not recording, is a quick way to bring up alsamixer and simple vu display meter.
For more details about pAVrecord, including user interface pic, please refer to its main Puppy Linux thread here:
http://murga-linux.com/puppy/viewtopic.php?t=81332
In multi-user DebianDog, to work with normal user (such as puppy) you need to add that user to the "video" group using:
and the user must of course have permission to the directory where recordings are to be saved, which by default is directory ${HOME}.
pAVrecord took a lot of its code from Precord, which is reflected in its one page configuration style of user interface. Its usage is reasonably well-known since it has been included by default in official and some official Puppies for a few years now. The user interface is perhaps a bit intimidating, at first glance, but the program is actually quite easy to use, especially if you just accept the default selections provided. Best approach to learning its use is to hover the mouse cursor over the buttons and entry fields to read their functional purpose, and also to read the "help button" provided help text. Easier still, is just to try it since the default provided settings should work out of the box in many cases (assuming you have already adjusted sound settings for microphone recording. An interface button to bring up alsamixer is provided in pAVrecord for that purpose).
In the rare event that the configuration file for pAVrecord ($HOME/.pavrecord/.pavrecordrc) ever gets corrupted, such that the pAVrecord program temporarily ceases to function, it is normally enough to simply shutdown the program and restart it. In normal use such corruption shouldn't happen, but it could if, for example, power was switched off whilst pAVrecord was in process of re-writing its config file. In worse case scenario, should restarting the program not repair the problem, simply delete $HOME/.pavrecord/.pavrecordrc and next time you start pAVrecord a clean version will be generated automatically.
EDIT: Now find install files for DebianDog (deb) and Puppy (dotpet) on main pavrecord thread here (it is already provided by default in DebianDog and most Puppies but check for latest version):
http://www.murga-linux.com/puppy/viewtopic.php?t=81332
pAVrecord modified for use in DebianDog (just remove the dummy tar extension). Requires ffmpeg and ffplay in addition to mplayer and/or gnome-mplayer and won't work with x11 only video driver; ffplay seems to need vo=xv.
I tested it with the ffmpeg downloadable via the script provided by Toni. Which encoders work will depend on the underlying ffmpeg used but mp4, mp3, aac_q, x264 and x11 screengrab all worked in my tests. Note that with some encoders (such as x264 video) the record video display window will sometimes take a while to open because of the encoding complexity. Pressing stop button, when not recording, is a quick way to bring up alsamixer and simple vu display meter.
For more details about pAVrecord, including user interface pic, please refer to its main Puppy Linux thread here:
http://murga-linux.com/puppy/viewtopic.php?t=81332
In multi-user DebianDog, to work with normal user (such as puppy) you need to add that user to the "video" group using:
Code: Select all
adduser puppy videopAVrecord took a lot of its code from Precord, which is reflected in its one page configuration style of user interface. Its usage is reasonably well-known since it has been included by default in official and some official Puppies for a few years now. The user interface is perhaps a bit intimidating, at first glance, but the program is actually quite easy to use, especially if you just accept the default selections provided. Best approach to learning its use is to hover the mouse cursor over the buttons and entry fields to read their functional purpose, and also to read the "help button" provided help text. Easier still, is just to try it since the default provided settings should work out of the box in many cases (assuming you have already adjusted sound settings for microphone recording. An interface button to bring up alsamixer is provided in pAVrecord for that purpose).
In the rare event that the configuration file for pAVrecord ($HOME/.pavrecord/.pavrecordrc) ever gets corrupted, such that the pAVrecord program temporarily ceases to function, it is normally enough to simply shutdown the program and restart it. In normal use such corruption shouldn't happen, but it could if, for example, power was switched off whilst pAVrecord was in process of re-writing its config file. In worse case scenario, should restarting the program not repair the problem, simply delete $HOME/.pavrecord/.pavrecordrc and next time you start pAVrecord a clean version will be generated automatically.
Last edited by mcewanw on Thu 19 Jun 2014, 04:49, edited 5 times in total.
github mcewanw
DoMyCommand - save and re-use your bash commandlines
Just remove the dummy tar extension from the attached deb; then you can install it from the right-click deb package filemanager facility.
DoMyCommand is a GUI front end to store and re-use your favourite bash, sh, or dash commandlines. It can be used, for example, as an enhanced Premote replacement to control commandline clients such as rdesktop (Remote Desktop Client to MS Windows desktops using rdp protocol), vnc, secure shell (ssh), wget and curl, or to convert or record media files using your favourite ffmpeg command pipe sequencies. The creative user could also add commands to provide outputs via yad, gtkdialog, or similar.
_____
Changes in version 9.0.3: hijack addon modules now use .hijack as their extension.
'hijack' expansion capability (as per DoMyFile, Precord etc) expanded to allow modular plugin addition of new main code, new functions, new gui panels and new gui general config buttons, More details on that simple facility, which can be used, for example, for modularly adding a new panel to the foot of the GUI can be found here:
http://www.murga-linux.com/puppy/viewto ... 913#656913
_____
DoMyCommand depends only on bash and gtkdialog for basic functionality. For some commandlines it will of course require any underlying commandline utility you wish to use to be installed (e.g. rdesktop for rdp, openssh-client for ssh client, ffmpeg for media conversions etc). Some of the provided combobox commandlines depend on Xdialog, xterm or rxvt, or sometimes the system text editor for outputs.
On pressing the 'play' button, DoMyCommand operates just as if the displayed command was typed into a console window and the 'Enter key pressed', but it brings the following advantages of a GUI environment:
* A dropdown list of pre-saved commands, which can be edited (modified, deleted, or appended to) in your system default text editor by pressing the Edit button on the righthand side of the dropdown list.
* New commands can thus be entered and permanently saved for re-use.
* Entry boxes (variables), which can, for example be used, for remote Computer URL address (A), remote login User name (U), remote login Password (P), and local Target Directory (TD). Note, however, that what you use the entry boxes to store is actually entirely up to you for the particular commandline you wish to run. The dropdown command can refer to these using standard bash shell syntax (i.e. $A, $U, $P, $TD).
* Entry data can be input manually, or via drag and drop, or cut and paste from your system filemanager.
* DoMyCommand also provides brief tool-tip text over most elements of its GUI, which becomes visible when the mouse is hovered over each element.
* Pretty much any bash commandline including quote marks and \ can be entered.
----
Commandline Usage
In a console enter command: domycommand --help
for brief commandline usage.
----
Tips:
To keep domycommand as the top window,
right-click on its window bar, and select Layer -> Above
In addition to outputting command results to a controlling xterm or rxvt terminal or to an Xdialog window, it is also possible to pipe command outputs to the 'leafpad' editor.
Alternatively, if you start domycommand from a terminal you can redirect its command output to that terminal using the syntax >/dev/tty
-----
If you are use DoMyCommand to download websites, you may sometimes want to add the options (refer to 'man wget' for details):
--adjust-extension (shortform is -E), if the pages downloaded don't come with .html extension at the end.
--wait=seconds (shortform is -w seconds), if you want to be kind to the server and wait the specified number of seconds between the retrievals.
--level=change the number of levels to something smaller than 5.
--convert-links (shortform is -k). After the download is complete, this converts the links in the document to make them suitable for local viewing.
--no-parent (shortform is -np). Do not ever ascend to the parent directory when retrieving recursively.
--domains=www.example.com (shortform is -D domain-list). Set domains to be followed. DOMAIN-LIST is a comma-separated list of domains.
--no-clobber (shortform is -nc). Skip downloads that would download to existing files
Other wget examples here:
http://en.wikipedia.org/wiki/Wget#Advanced_examples
http://wiki.hackzine.org/scripts/wget-grab-website.html
http://raywoodcockslatest.wordpress.com ... ring-wget/
- Attachments
-
- domycommand_9.0.3_i386.deb.tar
- DoMyCommand user-programmable program
- (5.7 KiB) Downloaded 670 times
-
- DoMyCommand_screenshot.png
- (43.23 KiB) Downloaded 4668 times
Last edited by mcewanw on Sat 02 Aug 2014, 11:08, edited 3 times in total.
github mcewanw
Converting pet packages:
Included in the latest DebianDog from 16.06.2014 - pet2sfs and pet2deb converting scripts.
http://smokey01.com/saintless/DebianDog ... pts.tar.gz
All File managers have right click option for converting pet file or directory with pet files.
For example right click on pet package or directory in Xfe -> Scripts -> and choose:
pet2sfs-convert - convert single pet to sfs
pet2sfs-dir-convert - convert directory with pet to sfs
pet2deb-convert - convert single pet to deb
pet2deb-dir-convert - convert directory with pet to deb
Or from terminal:
Load the sfs to test it and if it works you can make deb package for installing/uninstalling:
Both scripts keep the pet package untouched and auto-remove the working folders. The new deb or sfs file is in the same directory where the pet is. The process is automated without actions from the user.
pet2sfs does not change the pet package structure. It just removes pet.specs file and makes sfs from the working folder.
pet2deb (modded version of redeb + part of make-deb-package from RSH) changes the structure by moving executable file in /opt/bin and libs in /opt/lib. Then adds DEBIAN folder with control and postinst script to update-menus.
The control file will auto create package name, description and installed size.
The package name will be cut down to the basic package name (I hope in all cases). For example:
deadbeef-0.5.6-lucid.pet or dead-123-beef-0.5.6-lucid.pet will be only deadbeef
The correct installed size will be added as result from du -s of working directory.
All other inputs like Priority: Section: Maintainer: Architecture: Version: Depends: are fixed. You can change them using redeb right click option but it is not needed to have the deb package fully functional.
Example working package for testing:
http://smokey01.com/OscarTalks/opera-12.16.pet
The control file will look like this after creating deb with pet2deb and the menu entry will auto-appear:
Second example that seems to work but still needs some extra lib from terminal output message:
http://smokey01.com/OscarTalks/deadbeef-0.5.6-lucid.pet
Menu entry will auto-appear and the control file will look like this:
Note many packages will not work since there will be missing libs for them but from terminal output running the package name you will get the package names and you can use apt-get to search and install them.
Anyway the point of the scripts is to easy and most important safe test and convert pet packages that work right a way without adding dependencies.
http://smokey01.com/saintless/DebianDog ... pts.tar.gz
All File managers have right click option for converting pet file or directory with pet files.
For example right click on pet package or directory in Xfe -> Scripts -> and choose:
pet2sfs-convert - convert single pet to sfs
pet2sfs-dir-convert - convert directory with pet to sfs
pet2deb-convert - convert single pet to deb
pet2deb-dir-convert - convert directory with pet to deb
Or from terminal:
Code: Select all
pet2sfs <package>.petCode: Select all
pet2deb <package>.petpet2sfs does not change the pet package structure. It just removes pet.specs file and makes sfs from the working folder.
pet2deb (modded version of redeb + part of make-deb-package from RSH) changes the structure by moving executable file in /opt/bin and libs in /opt/lib. Then adds DEBIAN folder with control and postinst script to update-menus.
The control file will auto create package name, description and installed size.
The package name will be cut down to the basic package name (I hope in all cases). For example:
deadbeef-0.5.6-lucid.pet or dead-123-beef-0.5.6-lucid.pet will be only deadbeef
The correct installed size will be added as result from du -s of working directory.
All other inputs like Priority: Section: Maintainer: Architecture: Version: Depends: are fixed. You can change them using redeb right click option but it is not needed to have the deb package fully functional.
Example working package for testing:
http://smokey01.com/OscarTalks/opera-12.16.pet
The control file will look like this after creating deb with pet2deb and the menu entry will auto-appear:
Code: Select all
 Package: opera
 Priority: optional
 Section: utilities
 Installed-Size: 43372
 Maintainer: root
 Architecture: i386
 Version: 1.0.1
 Depends:
 Description: opera-converted-pet-to-deb
Second example that seems to work but still needs some extra lib from terminal output message:
http://smokey01.com/OscarTalks/deadbeef-0.5.6-lucid.pet
Menu entry will auto-appear and the control file will look like this:
Code: Select all
 Package: deadbeef
 Priority: optional
 Section: utilities
 Installed-Size: 7748
 Maintainer: root
 Architecture: i386
 Version: 1.0.1
 Depends:
Description: deadbeef-converted-pet-to-debAnyway the point of the scripts is to easy and most important safe test and convert pet packages that work right a way without adding dependencies.
Last edited by saintless on Fri 18 Mar 2016, 08:14, edited 2 times in total.
Live-snapshot and snapshot-make for live-boot-2x
Added in DebianDog after 16.06.2014:
It is only for live-boot-2x persistent method.
Live-snapshot + snap-make + desktop icon inside this archive:
http://smokey01.com/saintless/DebianDog ... ake.tar.gz
snap-make is moded version of live-make from Sfs (sfslinux). We need only the snapshot function since we have save file GUI utility. So I removed much options to make it only for create and refresh live-sn.
The refresh function is added as button but it works also from terminal:
or
Live-snapshot does not support deleted (wh) files that are in the main module (uninstalling programs for example). But it keeps all other changes, including changed files from the main module.
live-sn.cpio.gz is read-write compressed save file only few k in size and it changes its size depending of the changes you make. It is perfect for saving system settings on flash-drive for example. And you can keep many different name small files with different settings for different machines and load the one you need only. You can also use live-sn with live-rw save file or partition at the same time.
I will add more information after testing live-snapshot better.
It is only for live-boot-2x persistent method.
Live-snapshot + snap-make + desktop icon inside this archive:
http://smokey01.com/saintless/DebianDog ... ake.tar.gz
snap-make is moded version of live-make from Sfs (sfslinux). We need only the snapshot function since we have save file GUI utility. So I removed much options to make it only for create and refresh live-sn.
The refresh function is added as button but it works also from terminal:
Code: Select all
live-snapshot -fCode: Select all
live-snapshot --refreshLive-snapshot does not support deleted (wh) files that are in the main module (uninstalling programs for example). But it keeps all other changes, including changed files from the main module.
live-sn.cpio.gz is read-write compressed save file only few k in size and it changes its size depending of the changes you make. It is perfect for saving system settings on flash-drive for example. And you can keep many different name small files with different settings for different machines and load the one you need only. You can also use live-sn with live-rw save file or partition at the same time.
I will add more information after testing live-snapshot better.
Last edited by saintless on Fri 18 Mar 2016, 08:15, edited 5 times in total.
Hi All,
Here's a setup for conky transparent on JWM version.
The configuration is the same as included in openbox_xfce version.
First do in terminal:
Then extract attached conky-setup.tar.gz
Copy then the contents of extracted folder "conky-setup" to / (these are just some config files and script conky-start (in ~/Startup) , should work for user root and puppy.
Log out and back in again.
This should give transparent view when using default wallpaper.
If you change wallpaper, the path to the wallpaper should also be changed in ~/Startup/conky-start.
For example if you change path to wallpaper to "/opt/docs/pictures/02.jpg then change path in ~/Startup/conky-start from:
To:
Fred
Here's a setup for conky transparent on JWM version.
The configuration is the same as included in openbox_xfce version.
First do in terminal:
Code: Select all
apt-get update # If needed
apt-get install conky xli
Copy then the contents of extracted folder "conky-setup" to / (these are just some config files and script conky-start (in ~/Startup) , should work for user root and puppy.
Log out and back in again.
This should give transparent view when using default wallpaper.
If you change wallpaper, the path to the wallpaper should also be changed in ~/Startup/conky-start.
For example if you change path to wallpaper to "/opt/docs/pictures/02.jpg then change path in ~/Startup/conky-start from:
Code: Select all
if [ -f /mnt/live/tmp/modules ]; then
xli -fillscreen -onroot /opt/docs/pictures/01.jpg & conky -d -c ~/.conkyrc-port
else
xli -fillscreen -onroot /opt/docs/pictures/01.jpg & conky -d -c ~/.conkyrc-live
fiCode: Select all
if [ -f /mnt/live/tmp/modules ]; then
xli -fillscreen -onroot /opt/docs/pictures/02.jpg & conky -d -c ~/.conkyrc-port
else
xli -fillscreen -onroot /opt/docs/pictures/02.jpg & conky -d -c ~/.conkyrc-live
fi- Attachments
-
- conky-setup.tar.gz
- Conky config files and startup script
- (55.67 KiB) Downloaded 822 times
Hi Toni & guys; I asked Oscar in his Skype thread to make a new Skype complete with all that`s needed for it to run in Precise.
Toni; Is the new Skype-4.3.0.xxx available from Debian in any way possible?
I ask as Olga needs it to talk to her son Sergey in Russia, it`s all he has.
Many thanks for all everyone has done... Terry
.
Toni; Is the new Skype-4.3.0.xxx available from Debian in any way possible?
I ask as Olga needs it to talk to her son Sergey in Russia, it`s all he has.
Many thanks for all everyone has done... Terry
.
Hi, Terry
Boot DebianDog with save file.
Download latest Skype: http://www.skype.com/en/download-skype/ ... e=debian32
Install it with right click option Install deb or from terminal:
Fix the missing dependencies:
Then install pulseaudio:
Run pulseaudio from terminal (there will be warning you are running as root but it will work):
Run Skype from menu entry or terminal.
If you use internal microphone it should work now. If you use usb Camera + mic it may need some settings. Better write in the development thread about this:
http://www.murga-linux.com/puppy/viewto ... 011#793011
In case your mic does not work here is the quick way to run older skype instead on top of latest one:
1. Launch skype 4.3 (no need to type pulseaudio --start this time): set autologin and no update control (in Advanced Options). Quit Skype 4.3
Kill pulseaudio just in case:
2 Download this archive: http://ftp.seblu.net/archlinux/arm/pack ... pkg.tar.xz and extract it.
3. Move /usr/lib/skype/skype (from the extracted tar.xz) to /opt/bin/skype-old (in your running system).
4. Type skype-old in terminal and you will autologin in your account with older Skype 4.2 using Alsa again.
Toni
Boot DebianDog with save file.
Code: Select all
apt-get updateInstall it with right click option Install deb or from terminal:
Code: Select all
dpkg -i /path/to/deb-packageCode: Select all
apt-get -f installCode: Select all
apt-get install pulseaudioCode: Select all
pulseaudio --startIf you use internal microphone it should work now. If you use usb Camera + mic it may need some settings. Better write in the development thread about this:
http://www.murga-linux.com/puppy/viewto ... 011#793011
In case your mic does not work here is the quick way to run older skype instead on top of latest one:
1. Launch skype 4.3 (no need to type pulseaudio --start this time): set autologin and no update control (in Advanced Options). Quit Skype 4.3
Kill pulseaudio just in case:
Code: Select all
killall pulseaudio3. Move /usr/lib/skype/skype (from the extracted tar.xz) to /opt/bin/skype-old (in your running system).
4. Type skype-old in terminal and you will autologin in your account with older Skype 4.2 using Alsa again.
Toni