Page 2 of 6
Posted: Mon 28 Sep 2009, 21:11
by ASRI éducation
rcrsn51 wrote:For recyclers who want to image machines quickly, the easiest solution would be a remastered Live CD with the installer folder on the CD but external to the sfs file.
Thanks for your scripts
rcrsn51
The full-install interests me. So I Frenchified and added your script to remaster my Toutou Linux 4.1.2 repack (version edutainment FR, for children aged 3 to 12 years).
The beta version of this French adaptation (TL4.12-asri.edu-FULLversion_beta-1.5.5.iso) is available on
http://dl.free.fr/MuYEYr/ASRI_education/login Identifiant : ASRI Mot de passe : education
After some tests, I am convince that this feature could save time for volunteers from the association that I chair (ASRI education
http://asri.edu.free.fr/).
But things do not work and I don't know why. If someone can help me understand, it would be nice.
Indeed, when i use on my computer the script "fulscr", the result is a single format ext2 partition without swap (usually, I use ext3 + swap). Why ?
I also noticed a new file "pupswap.swp" placed at the root of the drive.
I read ligne 93 of the "fulscr"
Code: Select all
#Create a swap file
dd if=/dev/zero of=/mnt/$HDISK/pupswap.swp bs=1M count=128
mkswap /mnt/$HDISK/pupswap.swp
What does it mean ?
Best regards,

Delightfull installation on CF-card as an HDD
Posted: Wed 30 Sep 2009, 19:53
by Hubi5171
I made a frugal install to a Compact Flash Card to test an CF to PATA 2.5"(44pin) converter. All went O.K.
Desktop PC: Pentium 4 1700MHz, 768MB DRAM Memory, 1x FDD, 1x CD/DVD single side burner, no HDD (hard file).
HDD: thant's the point - using as an HDD replacement:
disconnected the only 3.5"HDD and installed instead:
mainboard - cable - 3,5" to 2,5" reduction - 44pinPATA to CF-card adapter - 256MB Compact Flash Card=sda1.
The swapfile (pupswap.swp) uses 128MB.
Red "storage full warning" appears on top of the screen - sda1 has four MB left free.
What for this exercise -
I'm planning to swap the HDD 8GB(customer replacable, W98SE and SUSE9.x) of my notebook (300MHz / 192MB Memory / USB1.2 / softmodem / CD ROM) against a 8GB 133x compactflash card (modifying an old HDD to carry the adapter with access for changing the CF card).
This entry is just to give feedback and to say MANY THANKS !
ciao Hubi
P.S.: repeated today this exercise by using an P-ATA (44pin=2,5"HDDs) to SD-card adapter, hence using a 2GB SD-Card as sda1.
ext2 partition without swap
Posted: Thu 01 Oct 2009, 20:04
by ASRI éducation
I am not lucky ...
Nobody has an idea to unlock my problem?
I studied the script installation and I do not understand what's wrong.
Thank you in advance
Posted: Thu 01 Oct 2009, 20:23
by sidders
ASRI eduction- This is on my to-do list. We did experiment with it some time ago, and dropped the full install part, however i have just looked through and Technosaurus came up with some code that will look at the ammount of RAM installed and then make a decision to do a Full or Frugal install. The full install could look back on that result and then double to make the appropriate swap.
I havn't looked at it for a while and am going to do a few full install's using the PUI and see exactly what is happening in the near future. Still working on SFS icons.
Heres the link to the posts
http://www.murga-linux.com/puppy/viewto ... 751#311751
Posted: Thu 01 Oct 2009, 20:36
by ASRI éducation
Sidders, a big thank you for this information.
I immediately test the link you suggest.

Posted: Sat 03 Oct 2009, 22:25
by rcrsn51
@ASRI: A swap file is a quick way to create swap space without having to repartition your hard drive. If you use the "free" command, you should see the swap file memory in use.
However, if you prefer to build your hard drive partitions before installing Puppy, you just need to modify the one-click scripts. For example, in the full-install script, you could:
delete lines 74-85
modify lines 89 and 90
delete lines 92-94
Posted: Sun 04 Oct 2009, 14:43
by ASRI éducation
@ rcrsn51
Thank you for this information.

Re: How to do a One-Click Installation of Puppy
Posted: Thu 26 Nov 2009, 08:43
by inkheart
rcrsn51 wrote:...Here are the steps to do a one-click automated install.
We will assume that you already have a Live CD that works on the target machine and you are familiar with basic Puppy operations. Read
here for more information. (If you want to install Puppy in a dual-boot setup with Windows, read
here.)
Download and extract the package of installers below. It contains installation scripts that will do an automatic hard drive install of any official Puppy version back to 2.15. There are scripts for both frugal and full configurations. For most machines, a frugal install is the simpler, faster choice. It also gives you the flexibility to add other features to Puppy, like Open Office.
These installers will erase the hard drive, format a new partition, create a swap file, install Puppy and set up the GRUB bootloader. They should work on any machine with standard hardware.
Download and extract the "installers" folder. Copy it to a flash drive or diskette. Or, if you already have the target machine on-line with the Live CD, just download the package directly and store it in /root.
Boot the target computer off the Live CD.
If there is an existing version of Puppy on the hard drive or if you have been storing a pup_save file there, you must boot up by typing the option:
Leave the CD in the drive.
Mount the flash drive or diskette, open the "installers" folder and click on the icon labelled "frugal-install". Before installation starts, you will get to answer a YES/NO question.
When the installation is done, finish with a shutdown/reboot and make a pup_save file. Your computer is ready to run Puppy on the next start.
...
I tried to follow the above steps. After the installation, i rebooted the computer. When puppy loaded, i tried to unmount the cd, but it said that i couldn't 'cause it was being used. I thought that if Puppy were installed on the hard disk, i won't need the cd anymore?
Custom Boot CD
Posted: Mon 30 Nov 2009, 21:34
by jamalexa
I used Browserlinux and added a .sfs and some pets, I created and renamed my pup_save file and ran this from the live cd. How can I take your "steps to make a custom boot CD for recyclers " and create my own boot cd? I want to install my customized Browserlinux for seniors in my church and community on donated computers. Please help.
Posted: Wed 16 Dec 2009, 15:13
by knuesel
following directions below. right mouse button step does not yield "window/enter path"...
directions:
Start "Menu | Filesystem | ROX-Filer file filemanager".
Click with the right mouse button and choose "Window | Enter Path" from the context menu.
Type this into the box labelled "Goto" (do not omit the slash at the end): /mnt/hda2/boot/grub/
You are now inside the /mnt/hda2/boot/grub/ folder.
Posted: Sun 20 Dec 2009, 15:30
by Diggs
Even after multiple Puppy/puplets installs and running Puppy on multiple computers I am still confused about one thing. When a FULL install is completing, the installer asks me to choose a size for my pup_save file(?). Why is there a save file on a full install? I want a full install that uses the entire drive without any worry about creating, watching or future expansion of a pup_save file. I wouldn't think there should be a save file on a full install? Am I missing something?
Posted: Sun 20 Dec 2009, 15:47
by sidders
Your right, there is'nt a save on a full install. On the initial shutdown select Do Not Save.
Posted: Sun 20 Dec 2009, 15:49
by rjbrewer
Yes; You're missing something!
Do NOT....make a save file with a full install.
When install is complete and it's time to reboot; remove
the cd.
A good video guide to full install:
http://www.murga-linux.com/puppy/viewto ... 782#201565
Posted: Sun 20 Dec 2009, 17:07
by Diggs
sidders wrote:Your right, there is'nt a save on a full install. On the initial shutdown select Do Not Save.
And how would anyone know this as it is the installer that is requesting that this be done? Meaning, maybe a comment should be added to the install verbiage/process that lets the user know this. As it stands now, it IS part of the install process and no one would know any different.
(Just my 2 cents)
Posted: Mon 21 Dec 2009, 08:20
by sidders
On the one click it does say at the end, however i think i have done the same thing using the Puppy Universal Installer.
Posted: Tue 22 Dec 2009, 01:44
by Diggs
All it would take is a line here saying for FULL Install do not save to file. Seems it would save some confusion as I'm sure I'm not the first.
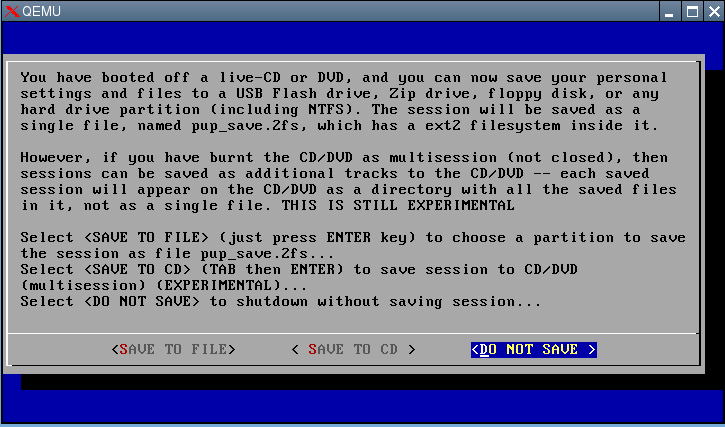
(Image compliments of CatDude)
Posted: Tue 22 Dec 2009, 02:25
by rjbrewer
Usually the cd ejects at the finish of the full install.
Maybe it was assumed that everyone would know not to save.
I don't know; it's been that way as long as I've used puppy,
yes, a note not to save at the end of the install would help.
Posted: Fri 15 Jan 2010, 08:34
by JohnFromPerth
Hi all
New to Puppy Linux so am going to ask some dumb questions.
I have an old NEC laptop with 498MHz Celeron, 192Mb RAM, 5Gb HDD, floppy and CD drives. Has 2 USB sockets but BIOS will not allow boot from them.
Laptop used to have Win98 but someone installed WinXP and it goes like a slug as can be imagined.
Plan to wipe the HDD and install Puppy. Have made a CD with Puppy on it and that boots up and runs OK. Downloaded installers.tar.gz file on to a floppy to do installation to HDD but this is a compressed or 'Zip" type file.
How do I unpack this file? What do I use? How do I copy the unpacked installer file(s) back onto the floppy?
Thanks
John
Posted: Fri 15 Jan 2010, 13:49
by rcrsn51
How do I unpack this file?
Just click on it. The package will open in Puppy's extraction program. Select all the files and save them to some convenient spot.
How do I copy the unpacked installer file(s) back onto the floppy?
Mount your diskette. Open a window onto the diskette and another window onto the location of the files. Drag them over just like you would do in Windows. Unmount the diskette before removing it.
Posted: Sat 16 Jan 2010, 06:21
by JohnFromPerth
Thanks rcrsn51
All went well with the install and I have a dedicated Puppy laptop.
A bit hairy at the end of the install as I was not quite sure when to kill Grub.
Will now have to learn not to double click everything!
Cheers
John