from the readme:
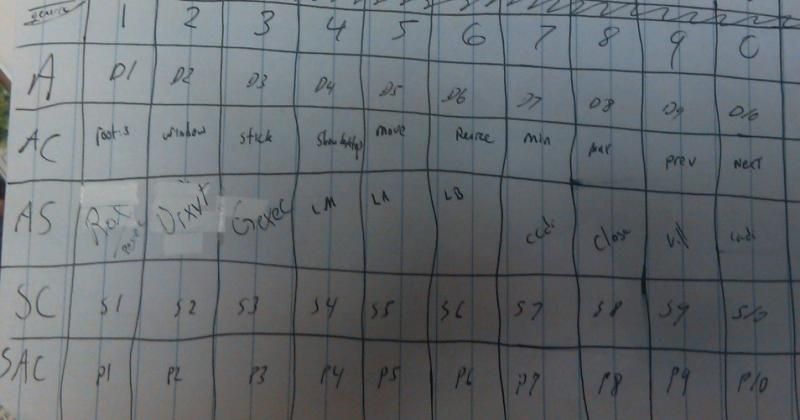
well, that was the readme in its entirety...if you've already got wmctrl installed, these 11 scripts copied or linked into /bin, /usr/bin, etc will give the terminal shortcuts s1-10, which turn the cursor into a crosshair--next click gets sent to the corresponding desktop. s0 is a stick/unstick toggle. stuck windows don't need to be unstuck before sent on their way with s1-s10--they are automatically unstuck and then sent.
a further tip. if you make a script named wll with the following text:
#!/bin/sh

wmctrl -l; wmctrl -d
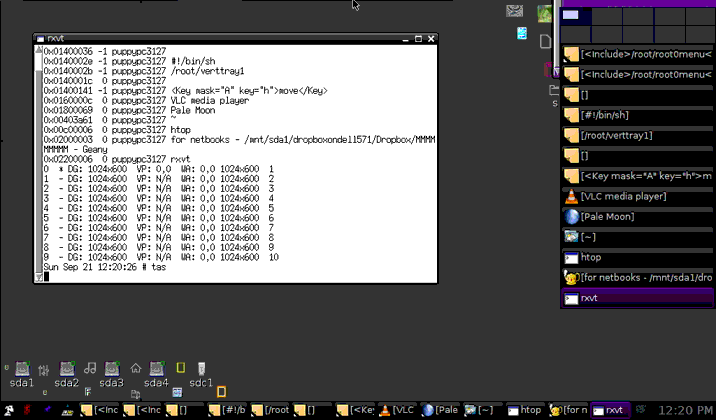
and copy that wll script into any bin folder (the "etc" in this file's first line refers to the fact that the machine will pick up any script in any of its bin folders; there are a bunch), you get a nice component to the d1-10 scripts (see Terminal Shortcuts compressed folder for them--it's barely bigger than this one and has wmctrl included), a list of the desktops, which one you're on, what windows are open, which desktops they're on. then, adding
[[ "$PS1" ]] && w11
to /root/.bashrc gives you the info right before the first prompt. subsequent entries are what ever you have your prompt set to (my does the date and time:
[[ "$PS1" ]] && w11
export PS1="\d \T \\$ "
)
if you want to see the windows and desktop info again, simply enter w11. s1-10 give you a cross hair that will sendto, s0 one that will toggle a state of stickiness, and d1-10 will just send you to that desktop.
enjoy.
w11 now included...
so anyway,
Code: Select all
[[ "$PS1" ]] && w11 where w11 is
Code: Select all
#!/bin/sh
wmctrl -l; wmctrl -d
something like
when you click shift+spacebar or otherwise launch urxvt, rxvt, or sakura. subsequent presses of enter just give the regular prompt (the second line in0x01e00066 6 puppypc27232 7
0x01e00039 3 puppypc27232 4
0x01e0003c 1 puppypc27232 2
0x01e00051 8 puppypc27232 9
0x01e00054 4 puppypc27232 5
0x01e00063 0 puppypc27232 1
0x01e00036 9 puppypc27232 10
0x01e0003f -1 puppypc27232 SendTo
0x01e0005a -1 puppypc27232 rox /root/Puppy Panel Pack/ShutDown2
0x01e0004a -1 puppypc27232 /mnt/home
0x01e0002f -1 puppypc27232 http://www.murga-linux.com/puppy/viewtopic.php?t=94591
0x01e00047 -1 puppypc27232 cal -y cal -j
0x01e00060 7 puppypc27232 8
0x01e00026 2 puppypc27232 3
0x01000009 -1 puppypc27232 htop
0x01600064 4 puppypc27232 Puppy Linux Discussion Forum :: Post a reply - Mozilla Firefox
0x02600003 8 puppypc27232 read me - /mnt/sda2/downloadsFFFsda2/spackwl - Geany
0x03800003 3 puppypc27232 sakura
0x00800003 3 puppypc27232 w1
0x0047776e 8 puppypc27232 /mnt/mmcblk0p2/Dropbox/MMMMMMMMM/panlepack (Thumbs)
0x0047b009 8 puppypc27232 ~ (All, Thumbs)
0x01e4a94e -1 puppypc27232 . /etc/profile
0x04800003 0 puppypc27232 sakura
0x004ab79a 4 puppypc27232 /mnt/sda2/downloadsFFFsda2/terminal shortcuts (Thumbs)
0x01e4e4d4 -1 puppypc27232 s0 s1 s2 s3 s4 s5 s6 s7 s8 s9 s10
0x004ae8a8 4 puppypc27232 ~ (Thumbs)
0x004af08f 4 puppypc27232 ~ (All, Thumbs)
0x004b1301 4 puppypc27232 /mnt/sda2/downloadsFFFsda2/spackwl (Thumbs)
0x004b1c96 4 puppypc27232 /mnt/sda2/downloadsFFFsda2/SupToTermShrtctsStickSendTo (Thumbs)
0x004b229e 4 puppypc27232 /mnt/mmcblk0p2/Dropbox/MMMMMMMMM/panlepack (Thumbs)
0x004b3020 4 puppypc27232 /mnt/sda2/downloadsFFFsda2 (Thumbs)
0x02800003 4 puppypc27232 sakura
0 - DG: 2880x900 VP: N/A WA: 0,0 2880x900 1
1 - DG: 2880x900 VP: N/A WA: 0,0 2880x900 2
2 - DG: 2880x900 VP: N/A WA: 0,0 2880x900 3
3 - DG: 2880x900 VP: N/A WA: 0,0 2880x900 4
4 * DG: 2880x900 VP: 0,0 WA: 0,0 2880x900 5
5 - DG: 2880x900 VP: N/A WA: 0,0 2880x900 6
6 - DG: 2880x900 VP: N/A WA: 0,0 2880x900 7
7 - DG: 2880x900 VP: N/A WA: 0,0 2880x900 8
8 - DG: 2880x900 VP: N/A WA: 0,0 2880x900 9
9 - DG: 2880x900 VP: N/A WA: 0,0 2880x900 10
Sun Aug 03 02:10:50 #
[[ "$PS1" ]] && w11
export PS1="\d \T \\$ "
gives the date and time.) you could swap out the w11 in the first line to run a program of your choice. you could add additional programs with the | character added after the w11/your first choice. i think it and what follows it need to be separated by a space. the info in the case of w11 is processed so quickly that there is no perceptible difference between this longish prompt and the regular one--window is ready instantly with or without the changes to .bashrc.
the longish batch is the windows list and the shorter one is the desktops. switch the order of -l and -d in w11 if you'd like that reversed.