mtPaint - Simple paint tutorial

How to do things, solutions, recipes, tutorials
Message
Author
User avatar
dejan555
Posts: 2798
Joined: Sun 30 Nov 2008, 11:57
Location: Montenegro
Contact:

#61 Post by dejan555 »

don570 wrote:

Code: Select all

#!/bin/sh
 for ZAD in /root/my_images/*.jpg ;do
  SUFFIX=_mod
  mtpaint --cmd -file/open="$ZAD" -e/'Load Clipboard'/1 -e/paste x=0 y=0   -selection/'Select None' -file/as="$ZAD"$SUFFIX
  mv -f  "$ZAD"$SUFFIX.jpg   "${ZAD%.jpg}"$SUFFIX.jpg
done 
I think suffix replacement could be done nicer and without mv:

Code: Select all

#!/bin/sh
 for ZAD in /root/my_images/*.jpg ;do
  SZAD=${ZAD/%.jpg/_mod.jpg}
  mtpaint --cmd -file/open="$ZAD" -e/'Load Clipboard'/1 -e/paste x=0 y=0   -selection/'Select None' -file/as="$SZAD"
done
puppy.b0x.me stuff mirrored [url=https://drive.google.com/open?id=0B_Mb589v0iCXNnhSZWRwd3R2UWs]HERE[/url] or [url=http://archive.org/details/Puppy_Linux_puppy.b0x.me_mirror]HERE[/url]

wjaguar
Posts: 359
Joined: Wed 21 Jun 2006, 14:16

#62 Post by wjaguar »

dejan555 wrote:SZAD=${ZAD/%.jpg/_mod.jpg}
This is a bashism, not portable to other shells.
To do the same in a standard way:
SZAD="${ZAD%.jpg}_mod.jpg"

User avatar
dejan555
Posts: 2798
Joined: Sun 30 Nov 2008, 11:57
Location: Montenegro
Contact:

#63 Post by dejan555 »

Hmm, yeah I've been reading more on using bash variable manipulations so I can use the builtins instead calling external programs when possible.
If anyone knows a good tutorial on this using standard "sh" (posix?) language link me.
And is there really a standard way that is applicable to all shells?
I know most of them have a switch to emulate standard shell or if called through #!/bin/sh symlink
Googling mostly gives results based on bash specifically.
puppy.b0x.me stuff mirrored [url=https://drive.google.com/open?id=0B_Mb589v0iCXNnhSZWRwd3R2UWs]HERE[/url] or [url=http://archive.org/details/Puppy_Linux_puppy.b0x.me_mirror]HERE[/url]

wjaguar
Posts: 359
Joined: Wed 21 Jun 2006, 14:16

#64 Post by wjaguar »

dejan555 wrote:And is there really a standard way that is applicable to all shells?
Yes. It is what POSIX standard is for. The Open Group Base Specifications, Chapter 2 - Shell Command Language
I know most of them have a switch to emulate standard shell or if called through #!/bin/sh symlink
Bash's "POSIX mode" does a lot of tweaks, but does NOT disable its syntax extensions.
Googling mostly gives results based on bash specifically.
It also gives lists of things not to do, if script is to work on Debian/Ubuntu's dash. Like this one, and another linked from it.

User avatar
dejan555
Posts: 2798
Joined: Sun 30 Nov 2008, 11:57
Location: Montenegro
Contact:

#65 Post by dejan555 »

Thanks, seems like they're all usefull links, however on the Bashism link where there's example similar to what I proposed says that this kind of parameter expansion is not defined by posix and offers alternative of calling printf/sed
${name/foo/bar} -- you can use $(printf '%s\n' "$name" | sed 's/foo/bar/'), after changing shell patterns to regular expressions. This originated in ksh93 and is also present in mksh, and zsh, but ksh93's substitution expansion differs from Bash's.
puppy.b0x.me stuff mirrored [url=https://drive.google.com/open?id=0B_Mb589v0iCXNnhSZWRwd3R2UWs]HERE[/url] or [url=http://archive.org/details/Puppy_Linux_puppy.b0x.me_mirror]HERE[/url]

wjaguar
Posts: 359
Joined: Wed 21 Jun 2006, 14:16

#66 Post by wjaguar »

dejan555 wrote:on the Bashism link where there's example similar to what I proposed says that this kind of parameter expansion is not defined by posix and offers alternative of calling printf/sed
Yes but that is for the generic case, when you need to do an undefined number of replacements, and/or need to match a complicated regex patten. Which in practice is quite rare.

The real, practicable cases are easily done through pattern remove.
When you know that the substring you want replaced is at end of string, you remove a suffix and add the replacement:
"${SOURCE%substring}replacement"
When you know it's at the beginning - the same, but remove a prefix:
"replacement${SOURCE#substring}"
And when you only know it's in there somewhere - you split the string in two on it, and merge back around the replacement:
"${SOURCE%%substring*}replacement${SOURCE#*substring}"

Even in replacing multiple substrings, you can avoid firing up sed, by doing the "middle replacement" above in a while loop - with the condition being that string after pattern remove is not the same as before:
while [ "$STRING" != "${STRING%substring*}" ]
Same condition in an if is used to check for presence of pattern in string.

You can find many usage examples of all these in the scripts in mtPaint package. :-)

User avatar
don570
Posts: 5528
Joined: Wed 10 Mar 2010, 19:58
Location: Ontario

#67 Post by don570 »

wjaguar wrote:You can find many usage examples of all these in the scripts in mtPaint package.
I didn't know there were scripts available :oops:
When you compile shouldn't you create a /usr/share/doc/ folder and
put the scripts in there?

________________________________________________________

User avatar
don570
Posts: 5528
Joined: Wed 10 Mar 2010, 19:58
Location: Ontario

#68 Post by don570 »

A corporate logo

A corporate logo should be saved to your hard disk, not in a clipboard
so I have revised the logo tutorial to use the alpha channel instead.
This is much better. 8)

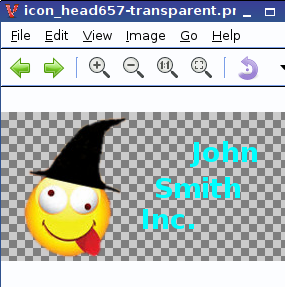
Goal : to make a company logo

1) make a screenshot of interesting face.

2) make rectangle beside the face in the color of desired text

Image

3) The next step is to make some region alpha=1 i.e. make that region visible

Channels > Edit Alpha
Channels > View Alpha as an overlay

4) Magnify to 300%
Use brush to select the logo.
Don't paint outside of logo .
(The alpha=0 region has a blue tint. alpha=1 region is non-tinted)

5) Gaussian blur of 2 --> this give slight blurring to edge of face

6) Place text in rectangle (invert must be ticked)

Image

7) Channels > Edit Image

8 ) Selection > Select All

9) Paste in original document. (Press <ENTER> key to place permanently)

10) Save to PNG file (leave default settings since these will preserve transparency)

11) Check with Viewnior image viewer (or equivalent) to see results.

Image
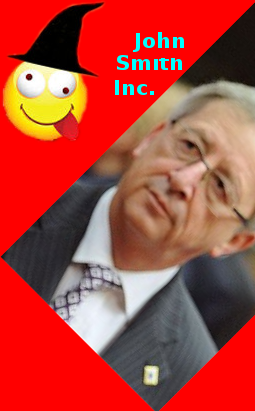
Now logo and text can be used in another document
using a simple copy to clipboard and paste(see image for final result)

Image
Last edited by don570 on Fri 16 Jan 2015, 00:02, edited 2 times in total.

wjaguar
Posts: 359
Joined: Wed 21 Jun 2006, 14:16

#69 Post by wjaguar »

don570 wrote:I didn't know there were scripts available :oops:
When you compile shouldn't you create a /usr/share/doc/ folder and
put the scripts in there?
No, I meant the buildscripts in the source package: ./configure and gtk/winbuild.sh
These are rather heavy on string operations, and by necessity portable.

User avatar
don570
Posts: 5528
Joined: Wed 10 Mar 2010, 19:58
Location: Ontario

#70 Post by don570 »

Here's the quick way to restrict an effect to a smaller area of the image
using mtpaint. It requires that you copy the smaller area to an upper layer...

Here is example of making part of image greyscale . the rest of image is
unchanged.

select area ---> polygon tool , drag of mouse
Edit > Copy
Edit > Paste to New Layer
Tick ---> Show all layers in main window
Press ESC to eliminate the dashed lines
(Note that these dashed lines refer back to lower layer
and still could be useful for an outline command for example)

Now do an effect on the new layer such as ...

Effects > Greyscale
Effects > Transform hue
Effects > Gausssian blur

You can save your result two ways. Look under 'Layers' menu

1) Save all layers (using File menu) and then use the command to save as composite
Layer > Save composite image


2) Make a composite layer and save this composite layer
Layer > "Composite to New Layer"
________________________________________________
Attachments
screenshot-mtpaint-second.jpg
process of making part of image greyscale
(21.98 KiB) Downloaded 605 times
Last edited by don570 on Thu 04 Feb 2016, 01:05, edited 4 times in total.

wjaguar
Posts: 359
Joined: Wed 21 Jun 2006, 14:16

#71 Post by wjaguar »

don570 wrote:Here's the quick way to restrict an effect to a smaller area of the image using mtpaint. It requires that you copy the smaller area to an upper layer...
The regular way to restrict any drawing op, effects included, to an area, is to mask the rest of image using mask channel.
http://mtpaint.sourceforge.net/handbook ... .html#SEC3
- select area
- Channels->New: Mask, Cleared
- Channels->Edit mask
- Selection->Fill selection
- Effects->Invert
- Channels->Edit image
- do whatever
- Channels->Delete: Mask

User avatar
don570
Posts: 5528
Joined: Wed 10 Mar 2010, 19:58
Location: Ontario

#72 Post by don570 »

The regular way to restrict any drawing op, effects included, to an area, is to mask the rest of image using mask channel.
That may be the regular way but I like the concept of individual layers
and each layer can be manipulated. Then mtpaint is a faster and simpler
version of gimp.

___________________________________________

User avatar
don570
Posts: 5528
Joined: Wed 10 Mar 2010, 19:58
Location: Ontario

#73 Post by don570 »

I looked at the chart making script that Dmitri has updated.
It's easy run in terminal ---> Open the folder and 'cd' inside it.

You must have mtpaint version 3.44.99 or more recent installed.
Then run script ....
/usr/bin/perl mdtim.pl

mdtim.pl ---> It's found in mtpaint handbook download in src folder
https://github.com/wjaguar/mtpaint_hand ... c/mdtim.pl

I made four changes

1) need to find a suitable font --->"Nimbus sans L"
Raspberry pi worked with "FreeMono"
2) horizontal lines made light grey
3) Text needed correction from grey to black
4) Icons changed for a distinct shape - more professional!!

Code: Select all

line 23

$font = "Nimbus sans L";

line 97

	$sc .= "-e/col a=9   -e/tool line " . list($main_co[0] - 6, $j, $main_co[2], $j);


line 99

	$sc .= "-e/col a=0 -e/freetype t=$i ";
An interesting thing I noticed in the script --->

'undo=1' is needed to return the chart after opening icon image.
-e/undo will then work.

You will get a warning message that undo is disabled if you don't use 'undo=1'
and the script doesn't work
Attachments
mtpaint-chart.tar.gz
perl script and icons
(4.17 KiB) Downloaded 300 times
mdtim.png
chart created by mdtim.pl script
(60.51 KiB) Downloaded 395 times
Last edited by don570 on Tue 14 Feb 2017, 00:40, edited 5 times in total.

wjaguar
Posts: 359
Joined: Wed 21 Jun 2006, 14:16

#74 Post by wjaguar »

don570 wrote:You will get a warning message that undo is disabled if you don't use 'undo=1'
and the script doesn't work
As you can guess, I never run mtPaint with that option disabled, since the day I added it. :-)
And now I think I should just set the toggle on by default in the next version. The legacy non-undoable behaviour is plain useless.

User avatar
don570
Posts: 5528
Joined: Wed 10 Mar 2010, 19:58
Location: Ontario

#75 Post by don570 »

Here are two scripts to practise scaling and pasting.

Some notes:

The first part of script simply creates an SVG image in /tmp.
Then comes the command to create a PNG image.
The first script makes a document , establishes a gradient, then makes
an interesting mirrored gradient (with the cut command)
Then opens the svg image and copies it to the clipboard.

-e/undo returns the gradient
A paste is done and two yellow lines added on top
Note that gradient had to be turned off to create yellow (grad=0)

Code: Select all

mtpaint --cmd   -f/new w=150 h=150 =24 -e/set  grad=1 -e/col a=0 b=115 -e/tool grad \(0,0 100,100\) -e/tool grad: type=lin ext=mirror -s/all -e/cut   -f/open='/tmp/tmp.svg' undo=1 -s/all -e/copy -e/undo -e/paste -e/set grad=0  size=3  -e/col a=3 -e/tool line \(0,0 150,150\) -e/tool line \(150,0 0,150\)    -f/as=/tmp/temp.png
_____________________________________________________

For the second script. A scaling of width and height is done as well

-image/scale w=x0.5 h=x1.2

Note that two undo's are needed to return the gradient because two operations were performed
-e/undo -e/undo

Code: Select all

mtpaint --cmd   -f/new w=150 h=150 =24 -e/set  grad=1 -e/col a=0 b=115 -e/tool grad \(0,0 100,100\) -e/tool grad: type=lin ext=mirror -s/all -e/cut   -f/open='/tmp/tmp.svg' undo=1  -image/scale w=x0.5 h=x1.2   -s/all -e/copy -e/undo -e/undo -e/paste -e/set grad=0  size=3  -e/col a=3 -e/tool line \(0,0 150,150\) -e/tool line \(150,0 0,150\)    -f/as=/tmp/temp.png


Attachments
mtpaint-scripts-scale.tar.gz
two scripts to practice scaling
(15.69 KiB) Downloaded 250 times
temp2.png
(7.96 KiB) Downloaded 323 times
temp.png
Open and scale of svg image
(7.75 KiB) Downloaded 330 times

wjaguar
Posts: 359
Joined: Wed 21 Jun 2006, 14:16

#76 Post by wjaguar »

don570 wrote:

Code: Select all

-f/open='/tmp/tmp.svg' undo=1  -image/scale w=x0.5 h=x1.2
When you know the desired size in pixels, it is better to load the SVG pre-scaled, than to scale it afterward; the resulting image will be sharper that way.
Like this:

Code: Select all

-f/open=test.svg width=512 height=256
Or you can set only one dimension, then the other will be scaled as per aspect ratio.

User avatar
don570
Posts: 5528
Joined: Wed 10 Mar 2010, 19:58
Location: Ontario

#77 Post by don570 »

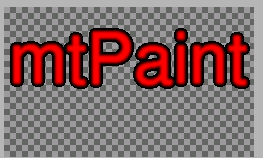
Here's a quick way to put a black outline around colored text
using a script...

Here is what the image looks like after saving with transparency="0"
Checkerboard area is the transparent area.
I then saved to clipboard 1 for future use.

I made a light blue image and pasted clipboard 1 inside for the final image.

Image

Code: Select all

#! /bin/bash
# script to outline text

mtpaint --cmd   -f/new w=250 h=150 =24   -e/col a=0 -s/all -e/cut -e/col a=1  -e/freetype font='Nimbus sans L' antialias=0 size=70 back=-1 angle=0  -e/freetype t=mtPaint -e/paste  \(10,10\) -effect/gaussian=3  -f/as=/tmp/temp.png transparency="0"  -s/all -e/copy  -e/'Save Clipboard'/1   -e/col a=6 -s/all -e/cut  -e/'Load Clipboard'/1  -e/paste  -f/as=/tmp/temp.png -f/open=/tmp/temp.png -effect/gaussian=1    -f/as=/tmp/temp.png 

Notes:
-e/paste \(10,10\) ---> I found that slight offset was needed to keep
text in document.

-effect/gaussian=3 ---> this puts the black fringe around text.
This is normally a bad thing :roll: but it is used to put
outline around colored text in this example.

-effect/gaussian=1 ---> this removes jagged edges, however it's not
essential.

Final result..
Image
Last edited by don570 on Sat 12 Mar 2016, 21:40, edited 2 times in total.

User avatar
don570
Posts: 5528
Joined: Wed 10 Mar 2010, 19:58
Location: Ontario

#78 Post by don570 »

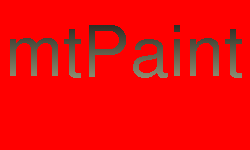
Here's a quick way to put a gradient in your text.
Note however that there is a bit of jaggedness because no
gaussian blur was used.

Notes:
-e/paste \(10,10\) ---> I found that a slight offset was needed to keep
the text entirely in document

antialias=0 must be used for the font of text

transparency="0" ---> makes the black of text transparent

You can check what clipboard 1 looks like by making your user home folder show hidden files

-e/"Load Clipboard"/1 -e/paste ---> the paste will set the clipboard in image

A gaussian blur won't work in this example because of the fringe effect
around edges.

Code: Select all

#! /bin/bash
# script to make gradient text

mtpaint --cmd   -f/new w=250 h=150 =24  -e/col a=1 -s/all -e/cut -e/col a=0  -e/freetype font='Nimbus sans L' antialias=0 size=70 back=-1 angle=0  -e/freetype t=mtPaint -e/paste  \(10,10\)  -s/all -e/copy -f/as=/tmp/temptext.png transparency="0" -s/all -e/copy  -e/"Save Clipboard"/1  -e/set grad=1 -e/col a=0 b=115  -e/tool grad \(0,0 0,100\) -e/tool grad: type=lin ext=mirror  -s/all -s/fill  -e/"Load Clipboard"/1  -e/paste -f/save=/tmp/temptext-gradient.png
Image

wjaguar
Posts: 359
Joined: Wed 21 Jun 2006, 14:16

#79 Post by wjaguar »

don570 wrote:-f/as=/tmp/temptext.png transparency="0"
Now that I fixed pref scripting in 3.49.01 :-) the proper way to set transparent color is through pref window: "-i/pref trans=0"
Another route is through layers window, it always worked: "-e/layer trans=0"
No need of a dummy save operation.

User avatar
don570
Posts: 5528
Joined: Wed 10 Mar 2010, 19:58
Location: Ontario

#80 Post by don570 »

No need of a dummy save operation.
Good info! Thanks.

__________________________________________


The outline can be made in any color that is available in the palette.
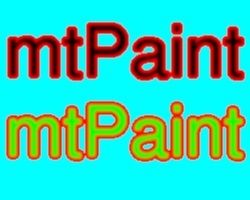
Here are two examples created from one script

Code: Select all

#! /bin/bash
# script to outline text

mtpaint --cmd   -f/new w=250 h=200 =24   -e/col a=1 -s/all -e/cut -e/col a=0 -e/freetype font='Nimbus sans L' antialias=0 size=70 back=-1 angle=0  -e/freetype t=mtPaint -e/paste  \(10,10\) -e/col a=2 -e/freetype t=mtPaint -e/paste  \(10,90\)  -effect/gaussian=3  -f/as=/tmp/temp1.png transparency="1"  -s/all -e/copy  -e/'Save Clipboard'/1   -e/col a=6 -s/all -e/cut  -e/'Load Clipboard'/1  -e/paste  -effect/gaussian=1 -f/as=/tmp/temp2.png 

Image

______________________________


When using the text tool, there are several characters that need protecting
with the back slash

( ) $ ; &

________________________________________
Attachments
temp2.jpg
Final result of running sript
(18.67 KiB) Downloaded 671 times

Post Reply