

I've never seen that error message. I don't use that puppy interface.
However when I try to paste a 24bit color clipboard into a 256 color
document it doesn't occur. There is no error message for me.
The mtpaint handbook briefly mentions this.
____________________________________________________
mtPaint - Simple paint tutorial
I have just discovered the wonderful tracing feature. it has been in
mtpaint since at least 3.40 but I didn't know about it
To start the tracing , load a photo into mtpaint.
___________________________________________________
Tip: create a new palette that will help reproduce the original flesh tones.
Palette > Create Quantized
This palette can be save to disk and used in other layers as well.
_____________________________________________
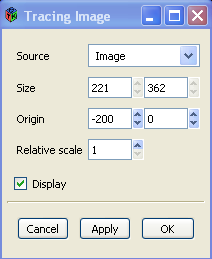
Next go to menu...
View > Tracing Image ...
Settings should be
Image
Offset about negative 200 pixels (i.e. move copy to the left)
Scale one
Tick box to see the result
Click the apply button to see a second copy image appear to left of original
Adjust the offset values to show the second image properly.
Create a second layer by selecting from menu
Layers > New layer
Layers Settings: Make black the transparent color and click
'Show all layers' box so image underneath can be seen.
Start painting with paint brush. Dab on some flesh colors
and use smear brush ( see image)
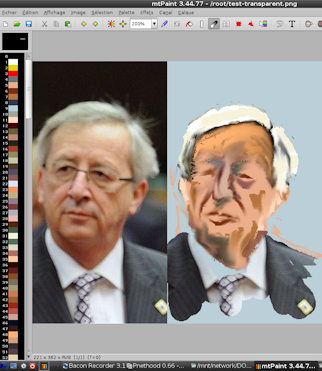
Paint with the color black to make the lower photo poke through.
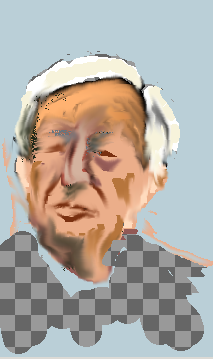
Here is the top layer that has been saved . The transparent region
will allow the man's suit to show.
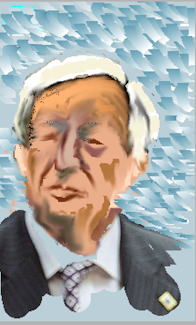
For a more interesting background use the paint brush with the gradient
turned on.
Note : Gradient settings--->
Length = 50 Type = Linear Color A = blue Color B = white
Save composite file . Here is final image...
mtpaint since at least 3.40 but I didn't know about it
To start the tracing , load a photo into mtpaint.
___________________________________________________
Tip: create a new palette that will help reproduce the original flesh tones.
Palette > Create Quantized
This palette can be save to disk and used in other layers as well.
_____________________________________________
Next go to menu...
View > Tracing Image ...
Settings should be
Image
Offset about negative 200 pixels (i.e. move copy to the left)
Scale one
Tick box to see the result
Click the apply button to see a second copy image appear to left of original
Adjust the offset values to show the second image properly.
Create a second layer by selecting from menu
Layers > New layer
Layers Settings: Make black the transparent color and click
'Show all layers' box so image underneath can be seen.
Start painting with paint brush. Dab on some flesh colors
and use smear brush ( see image)
Paint with the color black to make the lower photo poke through.
Here is the top layer that has been saved . The transparent region
will allow the man's suit to show.
For a more interesting background use the paint brush with the gradient
turned on.
Note : Gradient settings--->
Length = 50 Type = Linear Color A = blue Color B = white
Save composite file . Here is final image...
Last edited by don570 on Sat 19 Jul 2014, 18:55, edited 1 time in total.
mtPaint - Simple paint tutorial
Thanks don570 for the info.I am still searching for the anomalies of the "clipboard" difficulties.After doing a fresh install of RSHs Lazy Puppy 202 ,and it's resident mtPaint 3.44.03 ,still no joy can I find  I guess I will be required to continue using a combination of Gimp and mtPaint for "layering" as in simple tutorials like : [/url]http://www.murga-linux.com/puppy/viewto ... =94701[url] but no worries as there are many roads to a destination
  cheers
http://www.murga-linux.com/puppy/viewtopic.php?t=94701
http://www.murga-linux.com/puppy/viewtopic.php?t=94701
I'm running the latest mtpaint 3.44.78.
Questions:
1) does the "create arrow", as documented in the manual, still work? If yes, how to do it? I activated the ruler tool, click to start the line, and then what to do? I pressed "A" (or "a") and nothing seems to happen.
2) the manual also talks about a cool feature of using the undo-buffer to capture multiple screenshots and save them in one go. How exactly to use this feature (if it still works in the latest mtpaint)?
Thank you.
Fatdog64 forum links: [url=http://murga-linux.com/puppy/viewtopic.php?t=117546]Latest version[/url] | [url=https://cutt.ly/ke8sn5H]Contributed packages[/url] | [url=https://cutt.ly/se8scrb]ISO builder[/url]
mtPaint - Simple paint tutorial
Ah 007,I doubt if Ms.Moneypenny knows the ins and outs to your questions  This does however validate my belief that "user friendly" tutorials could be a Godsend to Puppy users if we could solicit folks "in the know" to post some.This is no small task and since Puppy is totally about "choice" then ??
Look like we need to ping on these developers but whether or not they have the time or inclination to respond is the question? cheers
Look like we need to ping on these developers but whether or not they have the time or inclination to respond is the question? cheers
- Attachments
-
- AboutmtPaint3.44.03.jpg
- (23.11 KiB) Downloaded 929 times

Hi
@ jamesbond
The arrows do work (i never knew it existed until i saw your post)
You were doing it right, though i suspect with the default settings you couldn't see it.
Open View > Show the Settings Toolbar (or press F7) and play with the Size and Flow
Left click to start the line, then when you have the other end where you want it,
either press 'a' or 's' depending on which style of arrow you desire.
As to your second question,
it looks like it's done via File > Export Undo Images
or File > Export Undo Images (reversed)...
again depending on what you want.
Hope this helps
CatDude
.
@ jamesbond
Just installed the same version in Slacko-5.7jamesbond wrote:I'm running the latest mtpaint 3.44.78.
Questions:
1) does the "create arrow", as documented in the manual, still work? If yes, how to do it? I activated the ruler tool, click to start the line, and then what to do? I pressed "A" (or "a") and nothing seems to happen.
2) the manual also talks about a cool feature of using the undo-buffer to capture multiple screenshots and save them in one go. How exactly to use this feature (if it still works in the latest mtpaint)?
The arrows do work (i never knew it existed until i saw your post)
You were doing it right, though i suspect with the default settings you couldn't see it.
Open View > Show the Settings Toolbar (or press F7) and play with the Size and Flow
Left click to start the line, then when you have the other end where you want it,
either press 'a' or 's' depending on which style of arrow you desire.
As to your second question,
it looks like it's done via File > Export Undo Images
or File > Export Undo Images (reversed)...
again depending on what you want.
Hope this helps
CatDude
.
- Attachments
-
- arrows.png
- (2.6 KiB) Downloaded 886 times
-
- defaults.png
- (16.05 KiB) Downloaded 951 times
-
- as-used-for-arrows-pic.png
- (16.52 KiB) Downloaded 837 times
-
- undo-buffer.png
- (48.08 KiB) Downloaded 871 times
[img]http://www.smokey01.com/CatDude/.temp/sigs/acer-futile.gif[/img]
Re: mtPaint - Simple paint tutorial
If mtPaint says "Unable to load clipboard", the simplest reason might be that there really is no clipboard to load.bill wrote:I am still searching for the anomalies of the "clipboard" difficulties.
Barring that, another reason can be that PNG support is broken. Can your copy of mtPaint save/load PNGs at all?
Breakage happens when two different versions of libpng get loaded at once: mtPaint having been linked with one, and GTK+2 with another. Output from "ldd mtpaint" will show whether this is the case.
Yes, this is the part that I missed. Thank you!CatDude wrote:You were doing it right, though i suspect with the default settings you couldn't see it.
Open View > Show the Settings Toolbar (or press F7) and play with the Size and Flow
I understand this part, but the question is, how do I get the screenshot from within mtpaint? I am under the impression if I can take new screenshots from within mtpaint, it will cause the previous one to be shifted into "undo buffer" which can later be saved with the command you mention - but how do I get these subsequent screenshots? (the first screenshot is easy - just mtpaint -s). Unless I understood wrong?As to your second question,
it looks like it's done via File > Export Undo Images
or File > Export Undo Images (reversed)...
again depending on what you want.
@bill - the reason I posted here is because I know experts like CatDude and the mtpaint maintainer are reading this thread
Fatdog64 forum links: [url=http://murga-linux.com/puppy/viewtopic.php?t=117546]Latest version[/url] | [url=https://cutt.ly/ke8sn5H]Contributed packages[/url] | [url=https://cutt.ly/se8scrb]ISO builder[/url]
mtPaint - Simple paint tutorial
Thanks wjaguar : Just for clarification this is Lazy Puppy K2.6.33.2 from a fresh
install.I haven't been able to save/load a clipboard.
install.I haven't been able to save/load a clipboard.
- Attachments
-
- Pfindlibpng.png
- (45.48 KiB) Downloaded 854 times
-
- lddmtPaint.png
- (5.08 KiB) Downloaded 804 times

Entering ldd mtpaint (or ldd mtPaint) into the terminal gives message (in Precise):Output from "ldd mtpaint" will show whether this is the case.
Code: Select all
# ldd mtpaint
ldd: ./mtpaint: Datei oder Verzeichnis nicht gefunden
# Entering ldd /usr/bin/mtpaint will give result (in Precise):
Code: Select all
# ldd /usr/bin/mtpaint
	linux-gate.so.1 =>  (0xffffe000)
	libgif.so.4 => /usr/lib/libgif.so.4 (0xb7776000)
	libjasper.so.1 => /usr/lib/libjasper.so.1 (0xb7721000)
	libtiff.so.4 => /usr/lib/libtiff.so.4 (0xb76bd000)
	libjpeg.so.8 => /usr/lib/libjpeg.so.8 (0xb7666000)
	libfreetype.so.6 => /usr/lib/libfreetype.so.6 (0xb75cc000)
	libz.so.1 => /lib/libz.so.1 (0xb75b6000)
	liblcms.so.1 => /usr/lib/liblcms.so.1 (0xb757d000)
	libpng12.so.0 => /lib/libpng12.so.0 (0xb7553000)
	libm.so.6 => /lib/libm.so.6 (0xb7526000)
	libgtk-x11-2.0.so.0 => /usr/lib/libgtk-x11-2.0.so.0 (0xb70be000)
	libgdk-x11-2.0.so.0 => /usr/lib/libgdk-x11-2.0.so.0 (0xb700f000)
	libgdk_pixbuf-2.0.so.0 => /usr/lib/libgdk_pixbuf-2.0.so.0 (0xb6fee000)
	libpango-1.0.so.0 => /usr/lib/libpango-1.0.so.0 (0xb6fa4000)
	libgobject-2.0.so.0 => /usr/lib/libgobject-2.0.so.0 (0xb6f54000)
	libgthread-2.0.so.0 => /usr/lib/libgthread-2.0.so.0 (0xb6f51000)
	libglib-2.0.so.0 => /lib/libglib-2.0.so.0 (0xb6e58000)
	libX11.so.6 => /usr/lib/libX11.so.6 (0xb6d24000)
	libpthread.so.0 => /lib/libpthread.so.0 (0xb6d09000)
	libc.so.6 => /lib/libc.so.6 (0xb6b60000)
	/lib/ld-linux.so.2 (0xb7782000)
	libpangocairo-1.0.so.0 => /usr/lib/libpangocairo-1.0.so.0 (0xb6b52000)
	libXfixes.so.3 => /usr/lib/libXfixes.so.3 (0xb6b4c000)
	libatk-1.0.so.0 => /usr/lib/libatk-1.0.so.0 (0xb6b2c000)
	libcairo.so.2 => /usr/lib/libcairo.so.2 (0xb6a87000)
	libgio-2.0.so.0 => /usr/lib/libgio-2.0.so.0 (0xb6930000)
	libpangoft2-1.0.so.0 => /usr/lib/libpangoft2-1.0.so.0 (0xb6903000)
	libfontconfig.so.1 => /usr/lib/libfontconfig.so.1 (0xb68cf000)
	libXext.so.6 => /usr/lib/libXext.so.6 (0xb68bd000)
	libXrender.so.1 => /usr/lib/libXrender.so.1 (0xb68b3000)
	libXinerama.so.1 => /usr/lib/libXinerama.so.1 (0xb68af000)
	libXi.so.6 => /usr/lib/libXi.so.6 (0xb689e000)
	libXrandr.so.2 => /usr/lib/libXrandr.so.2 (0xb6895000)
	libXcursor.so.1 => /usr/lib/libXcursor.so.1 (0xb688a000)
	libXcomposite.so.1 => /usr/lib/libXcomposite.so.1 (0xb6886000)
	libXdamage.so.1 => /usr/lib/libXdamage.so.1 (0xb6882000)
	libgmodule-2.0.so.0 => /usr/lib/libgmodule-2.0.so.0 (0xb687c000)
	libffi.so.6 => /usr/lib/libffi.so.6 (0xb6875000)
	libpcre.so.3 => /lib/libpcre.so.3 (0xb6839000)
	librt.so.1 => /lib/librt.so.1 (0xb6830000)
	libxcb.so.1 => /usr/lib/libxcb.so.1 (0xb680f000)
	libdl.so.2 => /lib/libdl.so.2 (0xb6809000)
	libpixman-1.so.0 => /usr/lib/libpixman-1.so.0 (0xb6771000)
	libselinux.so.1 => /lib/libselinux.so.1 (0xb6752000)
	libresolv.so.2 => /lib/libresolv.so.2 (0xb673a000)
	libexpat.so.1 => /lib/libexpat.so.1 (0xb6710000)
	libXau.so.6 => /usr/lib/libXau.so.6 (0xb670b000)
	libXdmcp.so.6 => /usr/lib/libXdmcp.so.6 (0xb6704000)
# Or just entering the directory first by: cd /usr/bin
and after this ldd mtpaint will work also.
[b][url=http://lazy-puppy.weebly.com]LazY Puppy[/url][/b]
[b][url=http://rshs-dna.weebly.com]RSH's DNA[/url][/b]
[url=http://murga-linux.com/puppy/viewtopic.php?t=91422][b]SARA B.[/b][/url]
[b][url=http://rshs-dna.weebly.com]RSH's DNA[/url][/b]
[url=http://murga-linux.com/puppy/viewtopic.php?t=91422][b]SARA B.[/b][/url]
How can I miss thatwjaguar wrote:File->New->Grab screenshotjamesbond wrote:how do I get these subsequent screenshots?
@don570 your tutorial is excellent, thank you for that. I think you should convert them into a more portable format than just forum posts.
Fatdog64 forum links: [url=http://murga-linux.com/puppy/viewtopic.php?t=117546]Latest version[/url] | [url=https://cutt.ly/ke8sn5H]Contributed packages[/url] | [url=https://cutt.ly/se8scrb]ISO builder[/url]
mtPaint - Simple paint tutorial
@ wjaguar :Just in passing ,I have looked in /root/.clipboard and don't see .clipboard ? in any of the distros I have booted ie Lazy Puppy,Slacko 5.6,puppy 5.2.8 and several others.I thought at first my old AMD64 was knackered but after trying mtPaint in an intel box,I continue to get the dreaded "can't load clipboard".Unless there are commands other than ctrl +F1 and Shift+ F1 etc. I reckon I will call this a lost cause and slink away If someone can post the exact distro with a functional clipboard (proven to be functional) or an exact command sequence,I will give that a try.Thanks to ALL for your patience and counsel.Cheers
In L.A.S.S.I.E. and/or Precise Puppy under mtPaint 3.44.13 saving a clipboard and loading it into another image loaded seems to work.
File .clipboard1 remains existing in /root after exiting mtPaint and can be loaded again after restarting mtPaint.
Maybe mtPaint in LazY Puppy is just too old (wasn't it 3.44.03?)?
File .clipboard1 remains existing in /root after exiting mtPaint and can be loaded again after restarting mtPaint.
Maybe mtPaint in LazY Puppy is just too old (wasn't it 3.44.03?)?
- Attachments
-
- image-7.jpg
- (44.88 KiB) Downloaded 706 times
[b][url=http://lazy-puppy.weebly.com]LazY Puppy[/url][/b]
[b][url=http://rshs-dna.weebly.com]RSH's DNA[/url][/b]
[url=http://murga-linux.com/puppy/viewtopic.php?t=91422][b]SARA B.[/b][/url]
[b][url=http://rshs-dna.weebly.com]RSH's DNA[/url][/b]
[url=http://murga-linux.com/puppy/viewtopic.php?t=91422][b]SARA B.[/b][/url]
I have a limited knowledge of HTML so maybe I could modify@don570 your tutorial is excellent, thank you for that. I think you should convert them into a more portable format than just forum posts.
the mtpaint handbook with my examples and post the modified handbook??
BTW I have found that it is easy to post videos on Youtube.
A resolution of 800 x 600 is possible. The audio must be wav not mp3.
The format must be avi. Youtube warns that they don't recognize the format but they upload anyway.
_______________________________________________
It should be possible to upgrade Lazy puppy to the latest mtpaint version,
since LAZY is just a modified Lucid Puppy.
Posting the hidden config file (.mtpaint) might help Dmitri understand what is happening.
I would try following commands to see where my HOME variable was.
Code: Select all
CD ~
CD $HOMEmtPaint - Simple paint tutorial
I may be in error but since I loaded Precise 5.7.1 I get the same results,no /root/.clipboard and nothing in /root so I am wondering if this is because I am running Frugal(memory stick) instead of Full Install ?.This is way past my pay grade but maybe one of you chaps might know.cheersRSH said :Precise Puppy under mtPaint 3.44.13 saving a clipboard and loading it into another image loaded seems to work.
Re: mtPaint - Simple paint tutorial
I'm running frugal only and generally.bill wrote:I may be in error but since I loaded Precise 5.7.1 I get the same results,no /root/.clipboard and nothing in /root so I am wondering if this is because I am running Frugal(memory stick) instead of Full Install ?.This is way past my pay grade but maybe one of you chaps might know.cheersRSH said :Precise Puppy under mtPaint 3.44.13 saving a clipboard and loading it into another image loaded seems to work.
I did copy the loaded (black, new) image into the clipboard by using "strg-a" and then "strg-c" and saved the clipboard after that by the menu entry - if this is of some help.
[b][url=http://lazy-puppy.weebly.com]LazY Puppy[/url][/b]
[b][url=http://rshs-dna.weebly.com]RSH's DNA[/url][/b]
[url=http://murga-linux.com/puppy/viewtopic.php?t=91422][b]SARA B.[/b][/url]
[b][url=http://rshs-dna.weebly.com]RSH's DNA[/url][/b]
[url=http://murga-linux.com/puppy/viewtopic.php?t=91422][b]SARA B.[/b][/url]
Seems to work in LazY Puppy under mtpaint 3.44.03.
- Attachments
-
- image-2.jpg
- (96.17 KiB) Downloaded 632 times
[b][url=http://lazy-puppy.weebly.com]LazY Puppy[/url][/b]
[b][url=http://rshs-dna.weebly.com]RSH's DNA[/url][/b]
[url=http://murga-linux.com/puppy/viewtopic.php?t=91422][b]SARA B.[/b][/url]
[b][url=http://rshs-dna.weebly.com]RSH's DNA[/url][/b]
[url=http://murga-linux.com/puppy/viewtopic.php?t=91422][b]SARA B.[/b][/url]
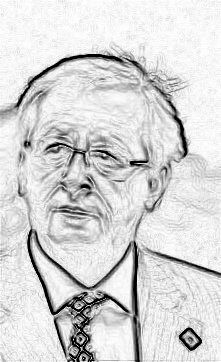
There is a quick method of making an outline of the head.
open a jpeg picture of person. Go to the menu...
Effects > Edge Detect (Sobel)
Effects > Invert
Effects > Greyscale (Gamma corrected)
You can switch the white to a pale color.
The quickest way is to paint with the opacity in the
settings toolbar window turned low.
______________________________________
Last edited by don570 on Thu 24 Jul 2014, 23:55, edited 1 time in total.